1. classes.dex 추가 파일 포맷
이전 글에 이어 계속 설명을 이어갑니다.
(3) Type IDs
다음은 classes.dex가 보유하고 있는 type들이다. 이 역시 헤더에 type 정보의 시작 위치와 개수가 저장되어 있다.
print hdr['type_ids_size']      # 전체 Type 정보 개수
print hex(hdr['type_ids_off'])  # 전체 Type 정보의 시작 위치
[실행결과]
279
0x11f4
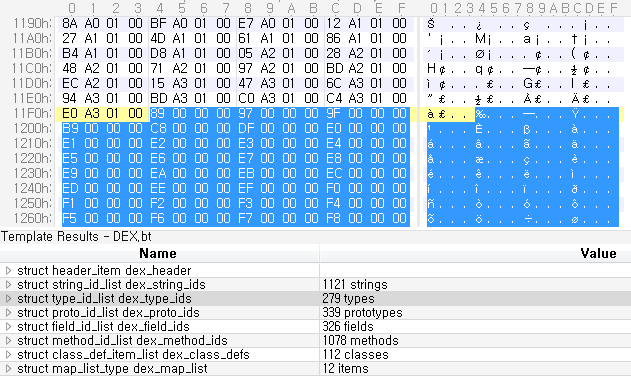
0x11f4 위치에서부터 전체 Type 정보가 시작 된다. 여기서 부터 전체 Type 정보의 개수 만큼 4Byte로 된 String 인덱스 값이 저장되어 있다.
type_size = hdr['type_ids_size']  # 전체 Type 정보 개수
type_off  = hdr['type_ids_off']   # 전체 Type 정보의 시작 위치

# 첫번째 Type 정보에서 String 인덱스 값을 얻는다.
string_idx = struct.unpack('<L', mm[type_off:type_off+4])[0]
print hex(string_idx)
[실행결과]
0x89
이렇게 얻어진 String 인덱스 값으로 string_id_list() 함수에서 추출된 전체 문자열 리스트에서 해당 문자열을 얻을 수 있다.
print string_ids[string_idx] # string_ids는 전체 문자열이 저장된 리스트
[실행결과]
C
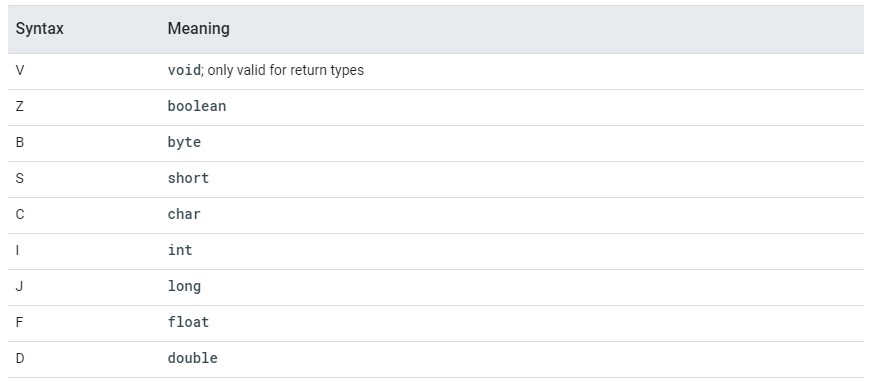
위 실행 결과에서 C를 얻게 되었다. 사실 이것은 char를 의미하는 단축 문자열이다. class.dex 내부에서는 자주 사용되는 변수의 Type들을 단축 문자열로 저장하여 공간을 절약하고 있다.
![Type 정보[0]이 가진 0x89(=137)번째 String 문자열 내용](/files/ff_dex2_2.png)
아래의 표는 단축 문자열들을 나타내고 있다.
이제 classes.dex가 가지는 전체 Type 정보를 추출해 보자.
#---------------------------------------------------------------------
# type_id_list : dex 파일의 type 리스트를 추출한다.
#---------------------------------------------------------------------
def type_id_list(mm, hdr) :
    type_list = [] # 전체 Type 정보를 담을 리스트
    type_ids_size = hdr['type_ids_size'  ]
    type_ids_off  = hdr['type_ids_off'   ]

    for i in range(type_ids_size) :
        idx = struct.unpack('<L', mm[type_ids_off+(i*4):type_ids_off+(i*4)+4])[0]
        type_list.append(idx)

    return type_list


#---------------------------------------------------------------------
# TEST
#---------------------------------------------------------------------
type_ids = type_id_list(mm, hdr)# 전체 문자열 출력하기

for i in range(len(type_ids)) :
    string_idx = type_ids[i]
    print '[%4d] %s' % (i, string_ids[string_idx])
[실행결과]
[   0] C
[   1] D
[   2] F
[   3] I
[   4] J
[   5] Landroid/animation/ValueAnimator;
[   6] Landroid/app/Activity;
[   7] Landroid/app/AlarmManager;
         (중간 생략)
[ 275] [Landroid/support/v4/view/ViewPager$SavedState;
[ 276] [Ljava/lang/Object;
[ 277] [Ljava/lang/Runnable;
[ 278] [Ljava/lang/String;
(4) Proto IDs
Proto는 함수의 원형에 대한 정보를 가지고 있다. Proto에 대한 정보의 위치와 개수는 헤더에 기록 되어 있다.
print hdr['proto_ids_size']      # 전체 Proto 정보 개수
print hex(hdr['proto_ids_off'])  # 전체 Proto 정보의 시작 위치
[실행결과]
339
0x1650
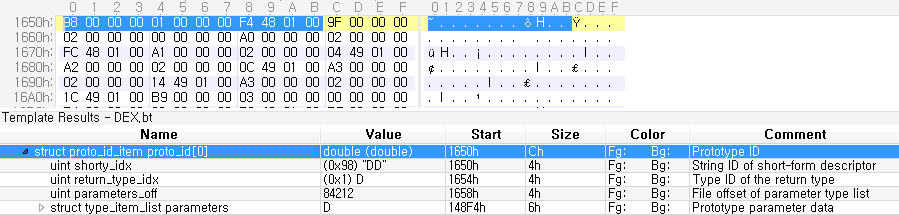
헤더에 저장된 0x1650 위치로 이동하면 아래와 같이 12Byte가 1개의 정보를 구성하고 있다.
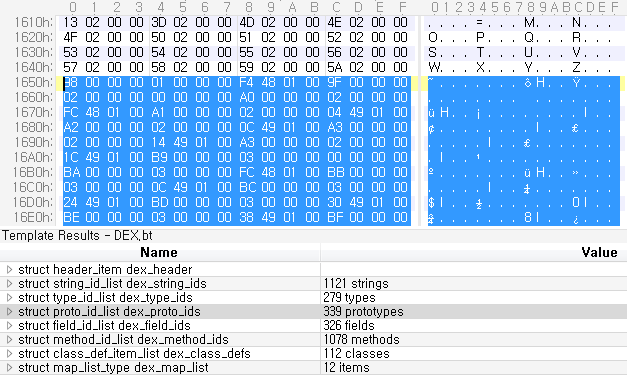
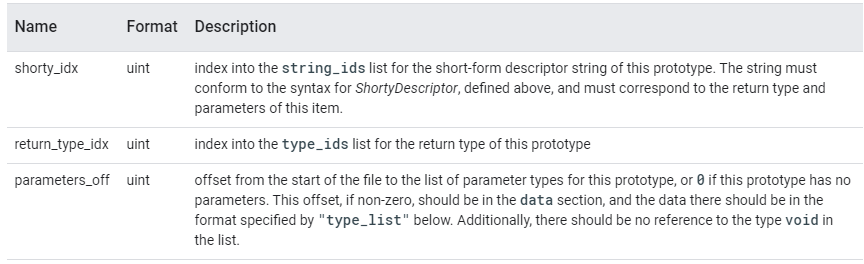
12Byte로 구성된 Proto 정보는 다음과 같다.
0x1650에 위치한 12Byte에서 정보를 추출하면 아래와 같다.
proto_size = hdr['proto_ids_size']  # 전체 Proto 정보 개수
proto_off  = hdr['proto_ids_off']   # 전체 Proto 정보의 시작 위치
shorty_idx      = struct.unpack('<L', mm[proto_off  :proto_off+ 4])[0]
return_type_idx = struct.unpack('<L', mm[proto_off+4:proto_off+ 8])[0]
parameters_off  = struct.unpack('<L', mm[proto_off+8:proto_off+12])[0]
print shorty_idx
print return_type_idx
print hex(parameters_off)  # 인자값 정보의 위치
print
print string_ids[shorty_idx]                 # 단축 문자열로 표현된 함수 원형
print string_ids[type_ids[return_type_idx]]  # 리턴값 문자열
[실행결과]
152
1
0x148f4

DD
D
위 결과를 통해 리턴값은 D, 즉 double임을 알 수 있다. 인자값도 확인해보자. 그러기 위해서는 위에서 인자값 정보의 위치인 0x148f4로 이동해야 한다.
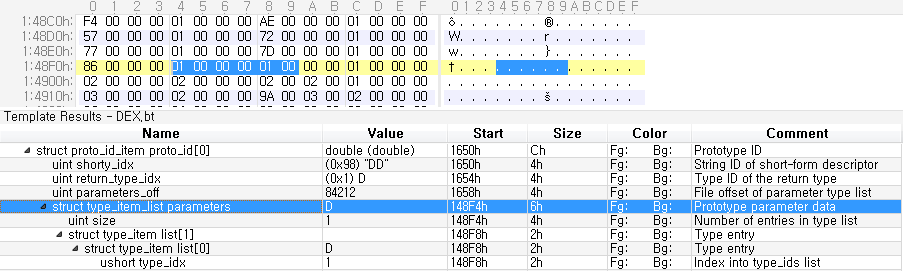
우선 4Byte는 인자값의 개수를 의미한다. 이 개수 만큼 2Byte씩 인자값의 Type ID가 된다.
off = parameters_off # 인자값 정보의 위치
parameter_num = struct.unpack('<L', mm[off:off+4])[0]
print parameter_num # 인자값 개수
off += 4
for i in range(parameter_num) :
    parameter_type = struct.unpack('<H', mm[off:off+2])[0]
    print string_ids[type_ids[parameter_type]]
    off += 2
[실행결과]
1
D
위 결과에서 인자값도 D, 즉 doublue이 된다. 즉, 최종적으로 함수 원형은 double (double)의 형태를 가지게 된다.
#---------------------------------------------------------------------
# proto_id_list : dex 파일의 prototype 리스트를 추출한다.
#---------------------------------------------------------------------
def proto_id_list(mm, hdr) :
    proto_list = []
    proto_ids_size = hdr['proto_ids_size'  ]
    proto_ids_off  = hdr['proto_ids_off'   ]
    for i in range(proto_ids_size) :
        shorty_idx      = struct.unpack('<L', mm[proto_ids_off+(i*12)  :proto_ids_off+(i*12)+ 4])[0]
        return_type_idx = struct.unpack('<L', mm[proto_ids_off+(i*12)+4:proto_ids_off+(i*12)+ 8])[0]
        param_off       = struct.unpack('<L', mm[proto_ids_off+(i*12)+8:proto_ids_off+(i*12)+12])[0]
        proto_list.append([shorty_idx, return_type_idx, param_off])
    return proto_list

#---------------------------------------------------------------------
# TEST
#---------------------------------------------------------------------
proto_ids = proto_id_list(mm, hdr)  # 전체 문자열 출력하기
for i in range(len(proto_ids)) :
    proto = proto_ids[i]
    idx   = proto[0]  # shorty_idx
    print '[%4d] %s' % (i, string_ids[idx])
[실행결과]
[   0] DD
[   1] F
[   2] FF
[   3] FFF
[   4] FI
[   5] FLI
[   6] FLI
[   7] I
[   8] IF
         (중간 생략)
 [ 333] LI
 [ 334] L
 [ 335] LI
 [ 336] LL
 [ 337] LL
 [ 338] LL
15번째 함수 원형을 확인해 보자.
proto = proto_ids[15]  # 15번째 함수 원형

shorty_idx       = proto[0]
return_type_idx  = proto[1]
parameters_off   = proto[2]

print shorty_idx
print return_type_idx
print hex(parameters_off)

print '----------------------------------'  # 리턴값 출력
print string_ids[type_ids[return_type_idx]]
print '----------------------------------'  # 인자값 출력
off = parameters_off # 인자값 정보의 위치

parameter_num = struct.unpack('<L', mm[off:off+4])[0]
print parameter_num # 인자값 개수

off += 4
for i in range(parameter_num) :
    parameter_type = struct.unpack('<H', mm[off:off+2])[0]
    print string_ids[type_ids[parameter_type]]
    off += 2
[실행결과]
194
3
0x14958
----------------------------------
I
----------------------------------
2
Landroid/support/v4/view/af;
Landroid/support/v4/view/af;
즉, 15번째 함수 원형은 int (android.support.v4.view.af, android.support.v4.view.af)가 된다.
2. 결론
이번 글에서는 함수 원형을 구성하고 있는 Type과 Proto에 대해서 살펴보았다. 사실 classes.dex 파일 포맷이 난해하고 복잡한 것은 사실이다.따라서 직접 해당 파이썬 소스 코드를 실행해보면서 하나의 파일을 집중적으로 보길 권한다.
다음에는 각 함수 내부에서 Field에 대해서 살펴보기로 한다.
3. 참조
- Dalvik Executable Format: https://source.android.com/devices/tech/dalvik/dex-format